Showing posts with label tutorials. Show all posts

Friday, June 08, 2012

Potpourri of the Week #4

Hey summer!  We couldn't wait for you to come, and now that's school's out, it's a pretty mean trick that you haven't come yet.  Please come soon and take away these dreary rainstorms.  We're bored (and driving our mom crazy!)

Yes, it's been one of those weeks.  Little Miss Sprout also thought it would be an opportune week in which to get sick and look extremely pathetic while doing so.  She and I have been embracing the night life, baby! 

So it's time for another Potpourri of the Week post - in which I share my favorite links to blog posts, web articles, books I'm reading, etc.  Let's jump right in!

1.  I love birthdays!  I admit I can get quite carried away when planning a party or family get-together.  But those fun times aren't worth the stress or crazy expenses.  Jessica at Life as Mom shares a great post on 12 Ways to Save on Birthdays.  We have already implemented a lot of these with our kiddos, and I am eager to try some of her other ideas for the multitude of birthdays coming up.


2.  God has really been doing a work in my heart lately.  I feel such a need to study and learn more than ever about the One who created me and sent His Son to die for me.  I am so excited to join in with Mandy at Biblical Homemaking in Walking Through the Gospel: Falling in Love with the One True and Living God series.   As she put it, "we're going to be studying who He is and who we are in relation to Him, and why we need Him so desperately."  So needed.  So desired.

3.  This is a cute tutorial for some adorable wall art.  I think it might be the answer to a sad-looking canvas that's been sitting in my office for the past few months.  I love the words on it, just not the way they look. 

4.  I am hoping that the weather will start admitting that it is indeed summer and warm up so we can hit up the pools and the spray parks!  I was looking at beach towels the other day and was trying to figure out what would work best for my babies' little shivering bodies when they get out of the water. (and then get back in two seconds later!)  Then I saw this tutorial on one of my favorite DIY blogs, Make It and Love It.  Ponchos made out of beach towels?  Yes please!  I'm putting these on my to-do list for the weekend. 

5.  And ahem. . . speaking of summer, this gal's body isn't quite ready.  I could pull out the excuses that "hey, I just had a baby in December" or "I can't find the time to exercise."  Honestly?  I love sweet things and eat them all the time.  I do manage to find time to nap (okay, maybe that one is a myth!), read, blog, facebook, play Words with Friends, watch Netflix, and basically sit around.  A lot.  So this post by Kris at Weird Unsocialized Homeschoolers was a bit needed.  Motivation, that is. 
And that's it for this week!  Maybe you actually have sunshine where you are - so get out and enjoy it! 

Monday, May 21, 2012

From Jeans to Fabric-Edged Shorts - A Tutorial

d
Although the weather here in western Oregon simply can't make up its mind, I am going ahead and clearing out the winter clothes and figuring out summer wear for the kiddos.  The Drama Queen wants shorts because "my other pants make me all hot and sweaty and dis-gust-ing."  Last year, she had the cutest knee-length shorts in a variety of colors and styles;  but apparently this year, shorts styles have gone the abundantly-short-and-skanky route.  No daughter of mine is going to wear shorts that could double as underwear!  Noticing that several pairs of jeans were going into the "getting-too-short" pile, I decided to make those into shorts for my girl.  

Here's how.  First, have your girly put the jeans on and mark on each leg about where you want the shorts to fall.  I used a Sharpie 'cuz I'm classy like that.  Cut off the jean legs at the mark.  (Save the jean legs for a future project.  Let them sit around in a messy pile for a while.  Realize that you are never going to get to the yet-undetermined project.  Throw them away!)

 It really doesn't take much fabric at all to make the edging for the shorts.  I had the Drama Queen look through my fabric stash and choose her favorite.  Measure around the short leg and add a little extra for length.  Decide how wide you want your edging to be and double that plus a little extra.  Cut two strips following these measurements.  Fold each strip like the photo above and iron so that the folds stay in place.

 Next, pin your strips in place.  The part of the strip that has the edge folded down a little should be on the outside of the pants leg.  Then sew with a straight stitch about a half-inch in from the top of the edging.

I went ahead and sewed a remaining scrap of fabric into a tie belt for the shorts, as the Drama Queen is skinny and hipless and needs all the help she can get to keep her pants up.

Easy.  Cute.  Very washable.  These particular shorts are her new faves and have gone through the wash several times already without falling apart.

Oh, and not skanky at all...

Thursday, May 17, 2012

Fits the Feingold Diet: Crunchy Cheese Stars

So in case you haven't noticed, I have four kids ages six and under.  This means that their little tummies are often empty, and the little beggars will come around looking for snacks.  Pre-Feingold, I would give them cheese and crackers, carrot sticks, tortilla chips, granola bars, goldfish, popcorn, etc.  While some of those are still good options for the offspring, manufactured snacks such as goldfish, graham crackers, and chips are out unless I want to shell out a lot of money for the organic, no-additive variety.  The frugal me says that's not okay, especially when my kids chow through a little box of crackers in one day.  Just sayin'.  So I have been on the hunt for recipes to make my own crackers (thank you Pinterest!) with these three goals in mind:  1) it has to have healthy ingredients  2) it has to be simple and not-too-time-consuming  and 3) it has to be tasty enough that the kids will eat it willingly - otherwise, it's so not worth it!  And in my search, I found this recipe for cheese crackers.  Five ingredients.  Prep sounded simple.  Baking sounded easy.  Pictures looked awesome.  And so I tried them.  Here's how my version went down:

First, I made the dough.  It's really just like making a pie crust, with the addition of cheddar cheese of course.  I took 4 TBS of butter, cubed it up, and threw it in my food processor.  Next I shredded up the cheddar cheese to get 8 ounces (make sure to use Feingold approved cheese) and attempted to add that to my food processor.  It was then I realized that I did not own a full-size food processor, but rather a "mini", which was not large enough to fit this recipe.  What to do, what to do?  I moved the cubed butter and shredded cheese to my blender, added a cup of flour, 3/4 teaspoon of salt, and pressed the button.  What happened next was a whole lot of nothing.  The blades whirled merrily around, doing nothing.  I shook the blender and did a lot of very-unculinary-like things to try to make it work.  Nothing.  Still persevering, I transferred the whole chunky mix to my Kitchenaid mixer.  I put that baby on high until finally the mixture was incorporated enough to add the 2 TBS cold water.   I then transferred the cracker dough (finally!!) to plastic wrap, wrapped it up tightly, and put it in the fridge for thirty minutes.  (Or maybe it was an hour, I did get pretty caught up in some Facebooking and Pinteresting...)

The next step was to put the dough on a sheet of wax paper and roll it out as thin as you can.  Realizing that I only had parchment paper in my pantry, I decided it would work just as well and commenced with the rolling.  This takes some muscle work, ladies!  The paper kept shifting on the table, and my only solution was to get one knee up on the table to hold down the paper while I rolled that dough.  And no, I did not get you all a picture of that athletic feat!  Eventually, I got a nice, even, thin slab of dough to cut out my stars.  Our Ordinary Life creatively made her own cutters out of a soda can.  I happened to have a little star cutter that worked just fine.  I cut and cut and cut and cut and put all those cheesy stars on my cookie sheet, close together because they wouldn't spread at all.  And then I baked 'em for fifteen minutes at 350 degrees.

Results?  Crunchy, buttery, cheesy, tasty crackers that were more than just a little addictive!  I rerolled the remaining dough a few more times to cut out the rest of the stars and baked them too.  What crackers actually made it past the hungry crew lying in wait in the living room were stored in an airtight container for future snacking.  And despite all my struggles with evil kitchen appliances and slippery dough, I felt it was very worth it.

I did some math for you all to figure out the cost of making a batch of these yummy crackers.  I used average costs for butter, cheese, and flour, with the final total being about $1.50 for 12 ounces of delicious cheesiness.  That's a lot cheaper than Annie's Homegrown Cheddar Bunnies!

I made these crackers a second time this past week, using the mixer straight away instead of messing with the other appliances.  My dough was not as pliable that time around and was much harder to roll thin.  I think I'm going to have to spring for a full-size food processor.  Me thinks there will be many more recipes in my future using this machine...

Wednesday, March 21, 2012

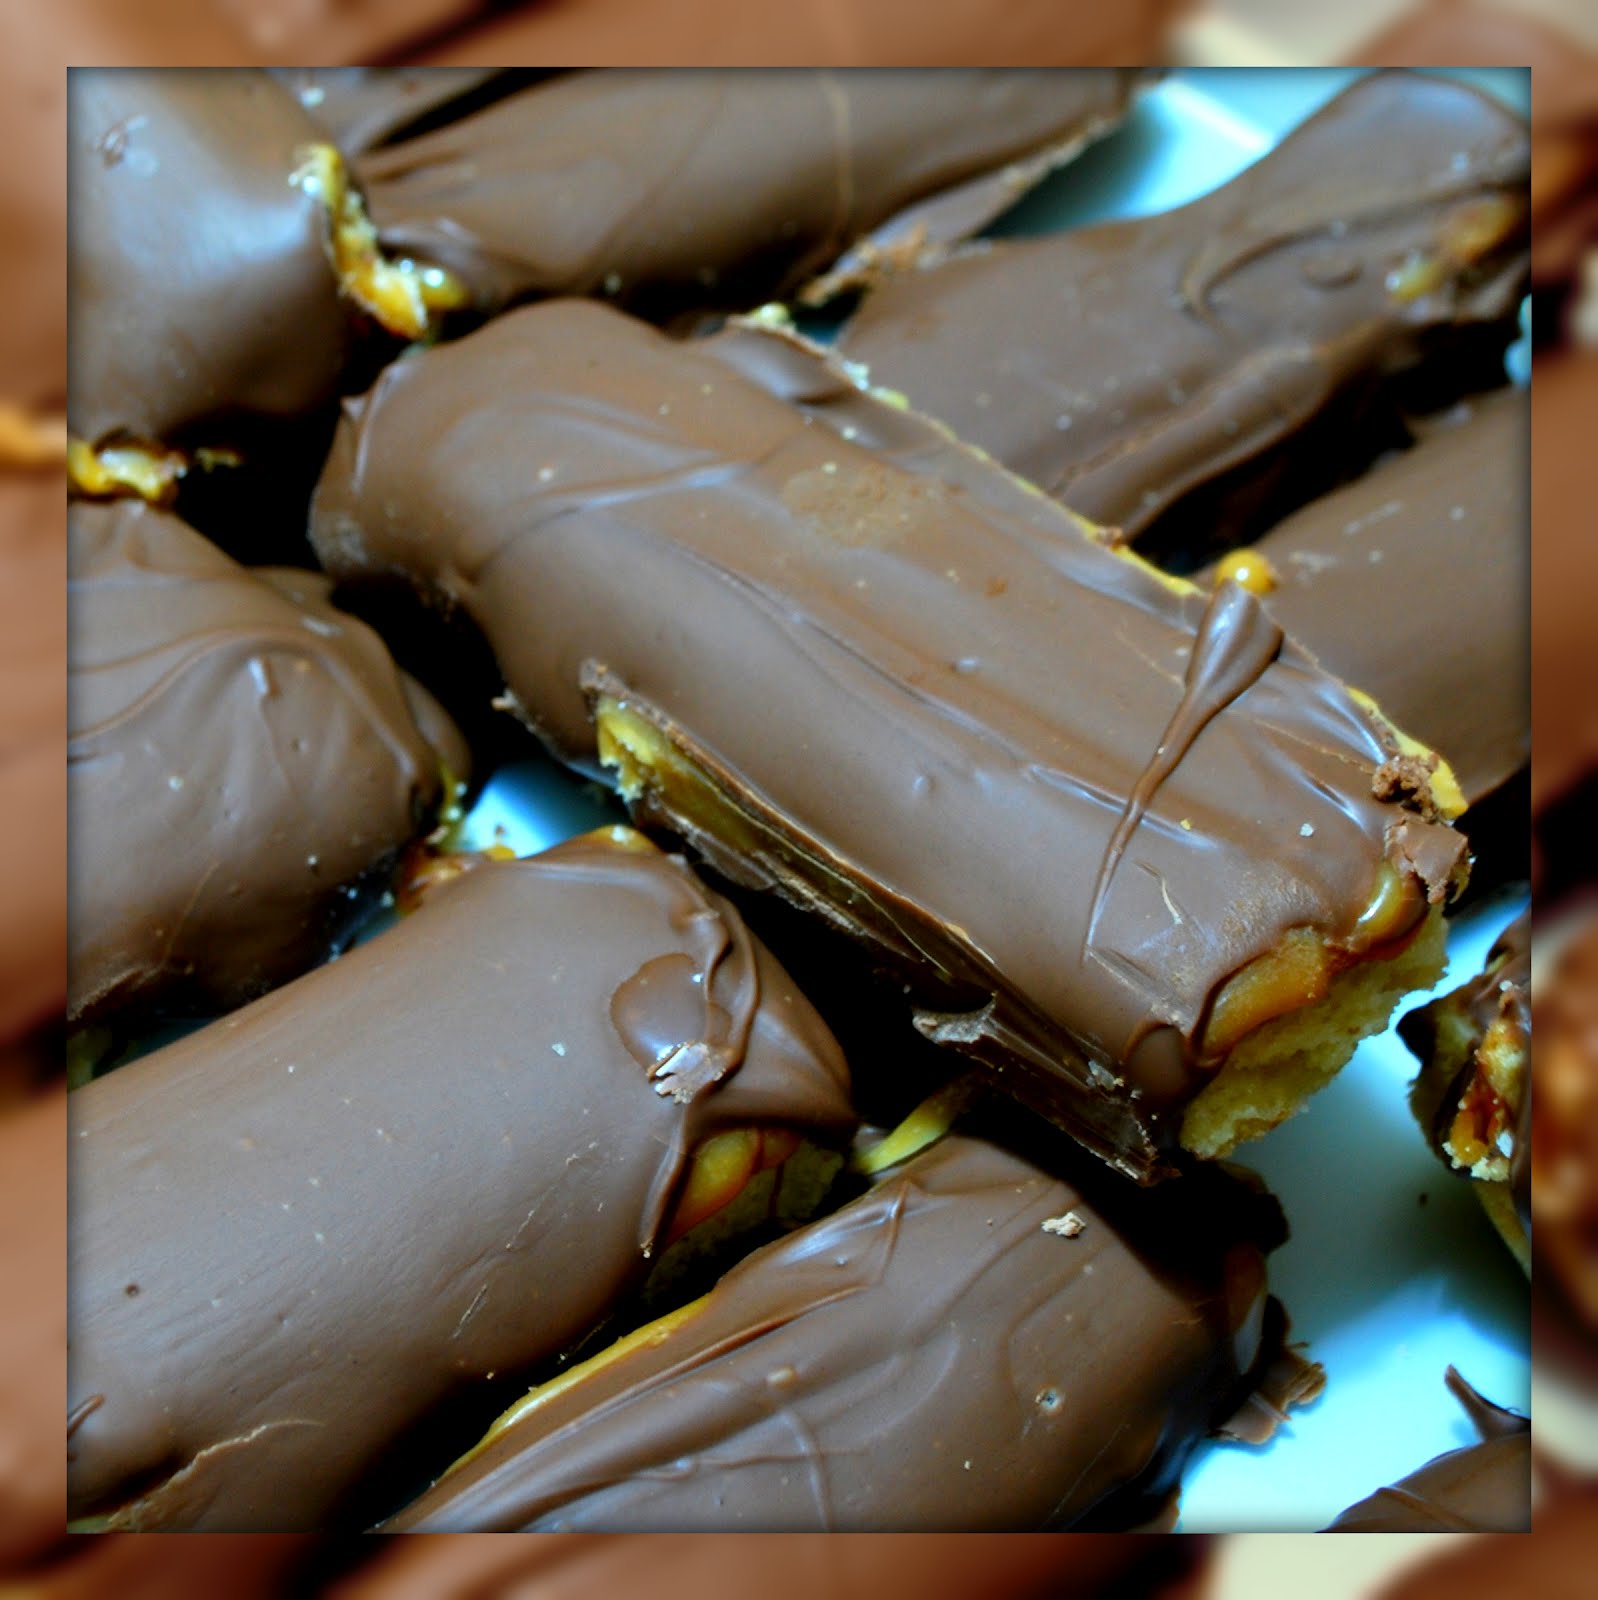
Better Than Twix Bars

I have been finally getting to some of the bazillion projects pinned to my "Making This" board in Pinterest. I chose my "Homemade Twix Bars" pin to make this past weekend for a family get-together. The recipe comes from King Arthur Flour under the title "Thousand Dollar Bars."
Don't lick the screen now, but I promise they taste as good as they look and in my opinion are even better than Twix bars! The recipe is made in three parts: the cookie, the caramel, and the chocolate. That worked out well for me because I had three eager little helpers, each of whom got to assist in a different part.
Here's the ingredient list: (for the cookie) 2 sticks of salted butter, 1 cup powdered sugar, 2 tsp vanilla extract, 2 cups flour (for the caramel) 1 bag of Kraft caramels, 3 TBS whipping cream (for the chocolate) 2 bags of milk chocolate chips. {some of these vary slightly from the original recipe, but I chose them because either it's what I had already or what I thought would work better.}
First, you will make the cookie. Make sure the butter is at room temperature (a quick way to soften butter is to grate it or use the defrost function on your microwave.) Then beat the butter, sugar, and vanilla together until thoroughly mixed. Add the flour and continue to mix until it is all incorporated into a stiff dough.
Take this dough and press into a greased 9x13 pan. (I lined my pan with parchment paper so that it would be easy to get the cookie out later.) Make sure the dough is evenly pressed down.
Next, use a fork to poke holes in the shortbread cookie dough before baking. Then bake the cookie at 300 degrees for 35 to 45 minutes.
This is what your baked cookie will look like. Only don't look that close or you'll be tempted to eat it all up before you make the caramel and chocolate layers. Here's where patience comes in. You need your cookie layer to completely cool before you make the next layer. Don't rush it!
When your cookie layer is completely cooled, start on the caramel layer. Unwrap the caramels (this is where it is very handy to have an autistic boy who is obsessed with opening things!) and melt them in a saucepan with the cream over low heat.
Pour the hot caramelly goodness over the cookie crust and put it in the fridge for thirty minutes to harden. (Hey, I said no licking the screen!)
When the caramel layer has hardened, cut it into long thin bars with a hot knife. Put the bars back into the fridge to stay cool while you get the chocolate ready.

Melt your milk chocolate chips in a sauce pan over low heat, stirring constantly. When the chocolate is melted and smooth, it is time to cover the bars. I decided to set my bars on wire racks and pour the chocolate over them. It worked but the bars looked messy and some chocolate was wasted, which was a terrible shame. Next time I will dip the bars into the chocolate. Anyway, put your chocolate-covered bars in the fridge and WAIT for the chocolate to completely firm up before attempting a taste. Also, if you are planning on taking these to a party or some other function, you should not taste these ahead of time. Once you try one, you will not be able to stop at just one.

I can't wait to try this recipe again but use semisweet chocolate chips instead. It is definitely a time-intensive recipe but completely worth it. :) Have fun indulging your sweet tooth!

Thursday, March 08, 2012

The Craft Nerd Needs Her Mojo Back

I joined the Pinterest craze last summer in the midst of the nesting phase of my pregnancy. Within the first two weeks of joining, I had already tried several crafts, sewing tutorials, and recipes from my boards.

Then. Well, I got larger and larger and less and less motivated. My kids were lucky to be getting fed those days, let alone with some fancy recipe off Pinterest. At the peak of my largeness, Little Sprout finally joined our family and we entered a new era of crazy. I have changed my outfit three times today due to that darling little child's spit-up and other body fluids. I have not counted how many times I changed her outfit. I explored the territory of root words and suffixes with my first-grader while simultaneously nursing the baby and imploring the boys to just clean up their room already. Pinterest has dropped way down on the priority list.

So. I am determined to rediscover some of the things that originally captured my attention and do them. It might take me several weeks to accomplish them, but hey, creativity needs to make a comeback at this house. I actually started one project already (two weeks ago), and the second my hand touched the paintbrush, I did a giddy little dance of excitement. Yes, I am that crafty-nerdy.

Here's a couple of things I am hoping to try soon:


cheer me on!

Tuesday, January 17, 2012

Angry Birds Cake Pops: A Quick Tutorial

We made Angry Bird cake pops for the Drama Queen's sixth birthday. They were my first attempt at cake pops, but I thought I would share how I decorated them for any Angry Birds fans that wanted to make their own. I had plans to make all the different birds as well as the pigs, but as the night wore on, it became clear that that wasn't a realistic goal. So I settled on making the yellow bird, the red bird, and a pig.
First, I made the cake balls. It's super easy - you just make a cake mix in a 9x13 pan and then crumble it into fine crumbs when it has cooled. Then take a can of frosting (chocolate fudge for us!) and mix about 3/4 of it into the cake crumbs. Combine it well and make sure to not add too much frosting, or the mixture will be too soft. Then mold the mixture into nice round balls for the pigs and red birds. Mold some of the mixture into flattened triangles for the yellow birds. Put all of your balls and triangles on a parchment paper covered baking sheet, cover tightly with plastic wrap, and refrigerate for several hours or freeze for fifteen minutes. You don't want them in the freezer for too long or they will be too cold, causing the candy coating to firm too quickly.
For the yellow bird, I melted vanilla candy coating and tinted it with yellow candy coloring. I inserted a lollipop stick in the coating and then into the base of the triangle cake ball. I dipped the triangle ball into the coating completely and gently tapped off the excess. The eyes were made from vanilla chips with the tips cut off to make them flat. The eyebrows were simply orange sprinkles, and the hair and wings were cut pieces of black licorice. I made the beak with melted orange coating on parchment paper. All decorations were attached with more melted candy coating used as "glue", and the pupils on the eyes were done with black decorator gel.
The pig was dipped just like the yellow bird, only this time the candy coating was tinted with green candy coloring. The snout was made from a lifesaver hard candy dipped in green candy coating and the ears were made from smarties candy dipped in green candy coating. His eyes were also made from cut vanilla chips and decorated with black decorator gel.

The red bird was dipped in red candy melts and had a beak made just like the yellow bird. His eyes were the same as the pig and yellow bird, but his eyebrows were made from cut pieces of black licorice as well as his wings.

I ended up making six of each character, and my daughter (and family) loved them. Be warned that they do take quite a bit of time to make. Since candy coating does not stay fluid for long and tends to firm up pretty quickly, you do have to have time to work uninterrupted. Unfortunately I had a very cranky baby that night and tried to both decorate Angry Birds pops and soothe the poor baby. (picture me rocking her in her car seat with one foot and balancing a bottle in her mouth while trying to precariously attach a sprinkle eyebrow at the same time. yeah. not so fun.)

Friday, November 18, 2011

Art Project #5 - Thankful Turkeys

This week's project is in preparation for Thanksgiving coming up next week. You should already have all the materials on hand, and the steps are super easy!

Project Title: Thankful Turkeys
Materials Needed: white paper, crayons, scissors, glue stick, pencil or pen
Purpose: To practice coloring and cutting skills as well as express the things one is thankful for.
Aren't these just the cutest turkeys?
First, you will need to trace your child's hands and one foot on the white paper. (The photos show a turkey made from an adult's hand and footprints; of course a child's prints will be smaller.) Have your child color the foot shape brown for the turkey body and the hand shapes in multiple colors for the turkey feathers. Assist them in cutting out the three shapes.
Make the other shapes needed to complete the turkey. Three triangles colored yellow will serve as a beak and feet. Two skinny yellow rectangles will be the legs, and don't forget to cut out two little eyes and a wattle. (Googly eyes would be cute too if you have them on hand).
Using the glue stick, have your child glue the two hand shapes together as shown. Cut off the thumbs - they won't be necessary for the project.

Then, help your child glue the rest of the turkey together. The foot shape comes next as the turkey body, glued on top of the hand shapes. Next, glue the facial features to the turkey's head. Finally, glue the legs to the back of the turkey body and glue the feet on the ends of the legs.

If your child is old enough to write, have them write down eight things they are thankful for. Cut out the words and glue to the turkey feathers. Write "(Name) is thankful for" on a small circle of white paper and glue to the turkey's tummy.

Then of course, don't forget to display the resulting cute turkeys for your Thanksgiving celebration! Save them afterwards, as they will be permanent reminders of the size of your little one's hands and feet at this age. :)

Thursday, October 20, 2011

Art Project #4 - String Pumpkins and Gourds

One of my earliest school memories is doing a project in which we wrapped string dipped in glue around a balloon in various patterns. When the glue dried, we popped the balloon and had a hollow string sculpture to display. While exploring Pinterest the other day, I was reminded of this simple project and thought it would be the perfect platform to make some pumpkin and gourd decorations for our home.

Project Title: Pumpkin and Gourd String Art
Materials Needed: orange and yellow cotton yarn or string, school glue, a shallow pan such as a cake pan or pie pan, several balloons, and glitter (optional). For finishing, you may want some green ribbon and decorative silk leaves.
Purpose: To work with the basic premises of sculpture and 3D art; to understand importance of structure to a 3D work of art.
First, gather your supplies. Blow up your balloons until they are a nice round or slightly oval shape, being careful not to make them too big. (If you want ornament-sized pumpkins and gourds, use water balloons.) Blow up a few extra balloons to entertain the 3-year-old.
Next, cut your string. Measure around your balloon with the string, leaving a little extra for overlap and cut. Use that string to cut many more pieces of the same size in both yellow and orange. Then make your glue mixture. The recipe I used called for one part glue to two parts water. I think it certainly could have used more glue - I would do one part glue to one part water next time. If you are a glitter lover like myself, whisk in some sparkly glitter into the mixture. This is a good opportunity for everyone to get a chance to "help."
After covering your work surface abundantly with newspaper or an old tablecloth, begin covering your balloon with string. Dip one string into the glue mixture until the entire string is completely soaked. Wrap the wet string around your balloon, making sure that the ends overlap a little. Continue wrapping soaked strings around the balloon, making sure to cover large spaces so there will be no big holes in the sculpture. I found that my young ones, including my kindergartener, struggled with this. They all wanted to bunch up the yarn or toss it haphazardly across the balloon. This is a good time to explain why it needs to be tightly wrapped and spaced out in order for the structure to survive. It is also a good time to help so that frustration doesn't last. Art is supposed to be fun!
Keep wrapping your balloon until you are satisfied with the coverage. If you are not sure, "overdo" it!
Here is a good example of what your balloon should look like, although I would have covered some of those holes even more. Leave the balloons on the newspaper to dry. When the strings on the top of the balloon feel dry, turn the balloon over so that the underside strings have a chance to dry also. We did ours on a Friday afternoon, and they were completely dry by Saturday morning. Next, carefully pop the balloons and remove the broken balloon from inside your string sculpture. Three of our sculptures didn't make it - they collapsed into a stiff pile of string due to inadequate coverage or too much bunching. Also, I think the glue mixture was a little weak, as I mentioned before.
Tie another piece of string to the top of your gourd or pumpkin sculpture for hanging. We then used a short piece of green ribbon and a decorative silk leaf tied to the top to make them truly look like pumpkins and gourds. I think they would be just as cute with just the green ribbon or perhaps some green felt leaves glued on.

And then be sure to hang up your creations! We are definitely going to revisit this project again at Easter time and make pastel eggs to decorate our home. By the way, if you insert a small wrapped candy or prize inside the balloon before you blow it up, your sculpture will have a fun surprise center!

Friday, October 07, 2011

Art Project #3 - Pointillism Apples in a Bushel

Project Title: Pointillism Apples
Materials Needed: white paper, school glue, glue stick, craft paint, q-tips, sticks/twigs, leaves, brown crayon, scissors
Purpose: To teach students about the art form of pointillism. Also is helpful in cutting and gluing practice.
First, gather all of your materials. For the bushel basket, I printed off this image here and cut it out as shown (minus the apples). For the apples, I printed off this image here and traced it six times on a sheet of white paper. The kids helped me gather small leaves and twigs for the project.
Next, set up the painting station. I used a divided plate for our three colors - red, green, and yellow, and gave each child three q-tips. I should mention that although it is not pictured, I did end up setting everything out on newspaper to protect the table! :) (If you have older kids, you can teach them how to mix red with various amounts of white to make different shades of red for their apples, and so on.)
Demonstrate how to dip the Q-tip into the paint and then make a dot in the apple shape without dragging it around like a paint brush. Have your child fill up the apple shape with as many dots as they can without blending them together. Your child may wish to do two or even three colors on their apple to make it more realistic looking. Explain that pointillism is painting with tiny dots so that they become blended in the viewer's eye. You can even demonstrate that putting a bunch of blue and yellow dots close to each other will make it appear green from a distance.
Once your child finishes painting her apples (or gets tired of it!), set them aside to dry. Have your child glue the bushel basket to the bottom of a blank sheet of white paper and then color it brown.
Next, use the school glue to make thin lines on the bushel basket and attach the twigs. Break the twigs to a smaller size if necessary. Remind your child that this glue does not dry instantly; thus they must be careful not to bump the previously placed twigs on their basket.
When all glue and paint has dried, give your child a safe pair of scissors and instruct them to cut out their apples. This is good practice for following a curved line with scissors. Help them if they get frustrated.
Use the glue stick to glue the apples wherever the child chooses in the bushel basket.
Finally, squeeze large dots of school glue to the top of each apple and gently set the stem of each leaf in the glue dot. Set the whole project in a place where it will not be disturbed until the glue has dried.

My daughter chose to write "A is for Apple" on her project, and we hung all three projects up as pretty fall decor when they finished.

I say "A is for Adorable"! :)

Friday, September 23, 2011

Art Project #2 - Dyed Rice Flag

Project Title: Dyed Rice Flag
Materials Needed: white poster board, crayons (red and blue), ruler, pencil, 4-5 cups rice, food coloring (red and blue), rubbing alcohol, school glue, mini marshmallows
Purpose: To teach students to explore different textures in art.
(I chose to do an American flag with this project since we studied it in history class and also since this art class closely followed the tenth anniversary of September 11th. The technique in this project however would be perfectly suited to any design or shape.)
First, gather your materials. You will also need two bowls and spatulas for the dying of each color of rice.
Then, dye your rice. For the red rice, we put two cups of rice into a large bowl. We added two teaspoons of rubbing alcohol and stirred it until all the rice looked wet. Then we added several drops of red food coloring and stirred until we were happy with the red color we achieved. For the blue rice, we used one cup of rice, one teaspoon of rubbing alcohol, and considerably less food coloring.
Spread each color of rice on a cookie sheet or pan with edges to dry. I put our trays on top of the stove and turned the oven to low to speed the drying process. The color on the rice dried very quickly.
While the rice was drying, I had the Drama Queen color the red stripes and blue field on the poster board flag I had drawn up the night before. The flag I made measured 13 inches by 22 inches. Each stripe was one inch wide, and the blue field measured 7 inches by 9 inches.
Now, it was time to add the rice. I squirted some school glue onto the blue field first and spread it into an even layer with a paint brush. Then we took handfuls of the blue rice and pressed them into the glue, covering as much of the area as possible.
We did the same thing with each red stripe. We found it was important to press the rice in firmly and put more rice on than you would think was necessary.
As the blue and red areas dried, I used another clean paint brush to carefully sweep away any rice that had fallen into the white stripes.
Finally, we added the white rice in between the red stripes. Don't stress if some white or blue rice makes it into the red stripes - you can remove those later with tweezers or just let it be. :)
When the project was completely dry, I tilted it up on one end and let all the loose rice fall off. ( I saved it all in a container for my autistic son to use in his sensory activities.) The Drama Queen helped me arrange the marshmallows on the blue field before I hot glued them in place. Before I could get the camera to take this last picture, however, the Spud managed to swipe a few marshmallows from the flag.

I haven't decided yet how we will display our flag - I probably will spray it with some sort of adhesive to make it more durable and then hang it in an area where a few grains of fallen rice here and there don't really matter.

The Drama Queen's favorite part was dying the rice*; so we plan on dying more colors of rice and making a big sensory box for the kids to dig and play in.

*You can also use this dying technique with any kind of pasta. Just be aware that the pasta takes much longer to dry than the rice does.